

While spending blood, sweat, and tears into recording podcasts, if you come across some delay in the audio playback, audio latency could likely be the prime suspect here. It significantly affects the quality of the podcasts and results in laggy audio tracks. Let’s know everything about latency today so that you can take the right measures to save your future podcast audio tracks from it and deliver the best audio quality to your audience.
What is Latency?
The term latency refers to the occurring delay between the audio signal sent and heard through the speakers or any other audio output medium. It is measured in ms.
Such delays can degrade the audio transmission quality and reliability.
For example, the actors suffer from latency issues when the audio either surpasses or lags behind the pace of the video.
Latency Vs. Bandwidth Vs. Throughput
Even though latency, bandwidth, and throughput work hand in hand, they do have slight differences.
- The bandwidth is the maximum amount of data passing through a network within a specific time period. Consider it as a pipe transferring your audio signals. The narrower the pipe, the lesser amount of data it will push.
- The latency determines the speed of the data transferred within the same pipe from the server to the listener and vice versa.
- Throughput is the average data transferred through the same pipe within a certain period.
Therefore, low latency and high bandwidth, which result in maximum throughput, are critical for a smooth audio transmission on both ends.
Types of Latency
Primarily, there are four types you can witness while recording or processing your audio files.
- Audio latency
- Network latency
- Computer latency
- Fiber optic latency
Let’s get into details about each one of them.
Audio Latency
Audio latency is simply the delay of a few milliseconds of about 10ms to 20ms between the sound creation and the final playback.
For example, in concerts at large venues, while testing the working of the mic, if you yell “Hello?” you eventually need to wait for a few seconds until you hear your own voice bounce back to you.
In podcasts, you have multiple audio files having the main content, background music, jingles, and so much more. Too many accumulated delays from every file may result in a massive lag in the complete audio playback.
Be it just a fraction of a second. It can surely turn down your audience in no time.
Causes
There are two main causes of latency while recording music files:
Mismatch Between The Audio Hardware And The Software
One of the prime causes of audio latency is the mismatch in the hardware’s timing with the software used for the audio recording and production process.
For example, while musicians record music wearing headphones, they cannot hear their own voice as they sing with the other orchestra, and as a result, they may notice a delay and instrumental drags during the performance.
This is because the vocals are piped right from the mic and move out through the headphone on the audio interface, which is a complete hardware setup. Now, when the orchestra is traveling from the DAW software through the digital-to-analog converter into the same interface and then moves out of the headphones, the lag is inevitable.
Read more about the Best Recording Software Solutions for Podcasts
Mismatch In The Audio Recording And Playback Timing
The next cause of audio latency includes the mismatch between the timing of the audio recording and how it lands right into your digital audio workstation, which is responsible for editing your audio files.
What Is An Acceptable Amount Of Audio Latency?
Even though we can reduce the amount of latency to a large extent with the help of the proper measures, it probably won’t completely vanish from your audio files. Hence, there are certain audio latency values that if exceeded, may ruin the entire quality of the music or audio playback. These values will help adjust your audio playback accordingly to make the latency least noticeable in the audio.
Vocals: 2 ms or less
Electric guitars: 5ms or less
Drums and Percussion: 5ms or less
Keyboard and piano: 20m or less
Audio Latency On Android With The Metronome
You can use multiple tools to adjust the audio latency in your audio files, and The Metronome is just one of the top-rated ones available for android. It has a beginner-friendly interface and a robust feature list, which will help you adjust the latency rates to your desired amount in a breeze. Here’s the step-by-step process for you:
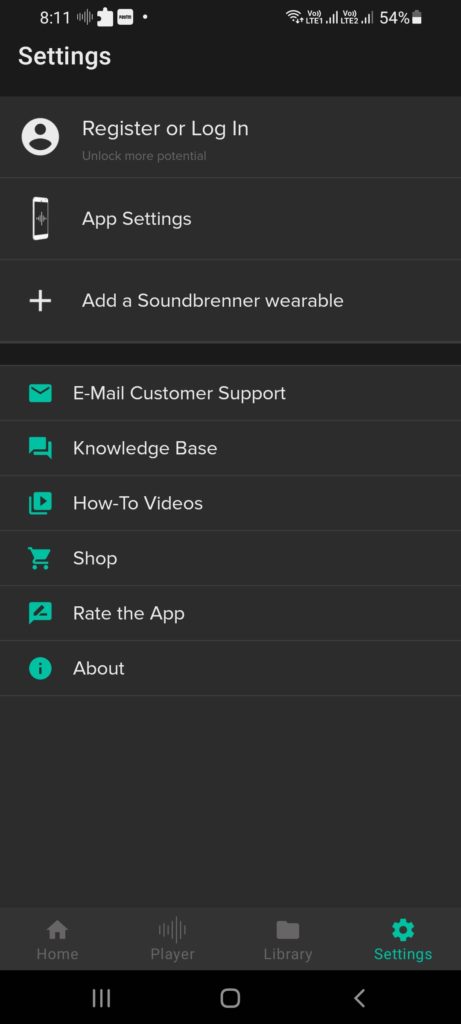
Step 1: Open The Metronome App and go to the Settings tab right at the bottom left corner of the screen. Click on App Settings.
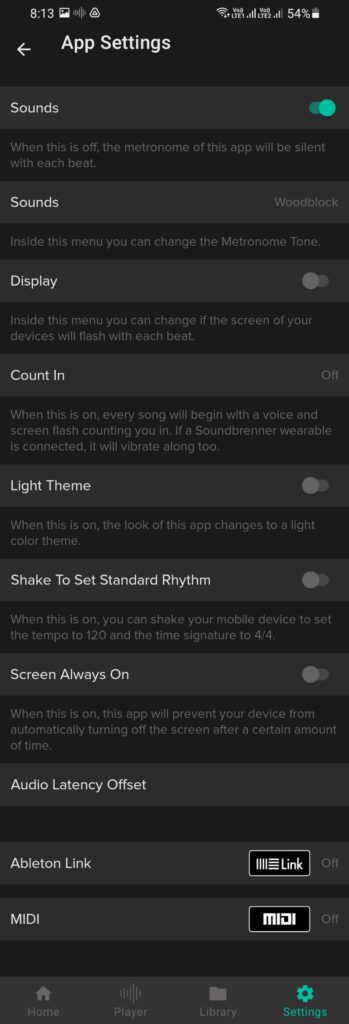
Step 2: Scroll down and click on Audio Latency Offset within the Settings menu.
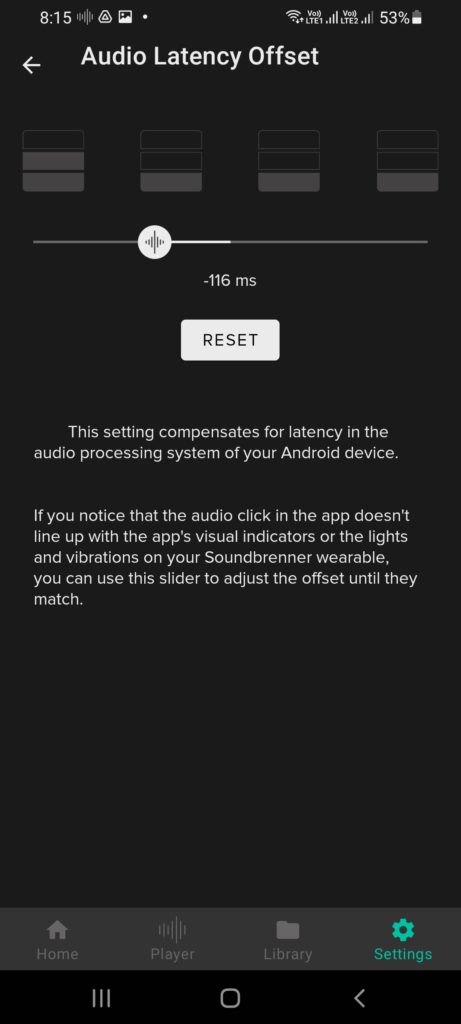
Step 3: Move the slider until the blinking LEDs and the audio is in perfect sync.
Solutions
Low audio latency is the only requirement for your audio files to be in complete sync during the playback. Let’s check out some easy solutions to achieve low audio latency for your podcasts.
Headphone Monitoring Latency
Most of us record in our laptops using the onboard sound card for collecting the audio from the microphone and the other inputs, which are then pushed together from the headphone jack. Here you won’t be able to record any intricate sound such as piano solo or fingerpicking on a guitar. This is due to the ongoing mismatch between you plucking the guitar string for the music and actually hearing it played back.
In such instances, you need an audio interface with a zero-latency monitoring system, often called a hardware monitoring system. It will route the sound that the input device(microphone) picks up from your voice and push it right out of the output device (headphones) while dodging the converter and the computer software associated with the audio production purpose.
Recording Latency
Here you can use your DAW to apply for a “delay compensation” for the consistent amount of latency between the initial and the final performance. This will automatically shift your tracks forward as per the specified time and compensate for the delay!
CPU/Buffer Balancing
You need to ensure that you have installed the correct drivers for your complete audio interface or any digital mixer that you use for your audio production in your DAW. Using pre-installed generic drivers may not be the best choice here since it can result in high latency problems. This is because drivers are typically the bridge between the software and the hardware.
Now, there is a need to find the right buffer balance in the audio.
You can also monitor your CPU usage right from your DAW for the buffer balance. However, it can bring some extra load to your CPU.
You cannot directly go for a high buffer amount to reduce the load in your CPU since it will increase the latency. On the other hand, using a low buffer to pressurize the CPU may result in issues within the CPU. The CPU has to calculate certain aspects such as the equalization, compression, flanger, reverb effects, and many more that you are running for the latency issue.
The only solution here is to experiment with the settings and find a sweet spot to balance out both and reap the desired results. This inexpensive change will go light on your pocket while giving you a low audio latency for your podcasts.
Understanding Audio Buffer
While recording and streaming live audio for your podcast or even just a music playback, there’s a lot of work going on within the hardware and the software. A buffer is necessary to keep the flow smooth and streamlined, but it comes with latency problems.
The DAW you use for your audio production consists of buffer settings that work with your computer’s RAM to separate a portion of the memory to use for the constant audio streaming samples.
But, what are audio samples?
And, what buffer settings are available in the DAW?
Well, samples are just ‘thin slices of time’ of audio converted into digital information during audio production. The higher the audio sample rate, the more slices are captured, which gets even thinner. This leads to high-resolution audio!
Your buffer options typically come in different ‘buffer sizes’ such as :
- 64
- 128
- 256
- 512
- 1,024
- 2,048
These numbers denote the number of samples the buffer holds to give ample time to your CPU for calculating the ‘resulting output latency’ and reporting it to you.
Hence, the more slices you store, the more latency you add to the audio files, but it also depends on your CPU.
If you try using a faster buffer rate and your CPU cannot cope, you will witness audio gaps, which is just the computer losing a few simples to catch up with the audio, which is an equal or even worse problem compared to the latency!
Typically, computers with a bottleneck in their CPU should go for 256 or 512 samples for the best results. Anything above 512 samples will typically end up in a completely maladroit situation with your audio!
Internet Latency
Internet Latency is prevalent in our everyday lives and is defined as the time taken for a request or signal to travel from the sender to the receiver and then for the recipient to process the same request. To sum up, it is the trip from the browser to the server!
Causes Of Network Latency
Some of the common causes of network latency include,
Transmission Mediums
The WAN or the fiber optic cables are some of the staple transmission mediums at every place, which comes with certain limitations that give rise to latency in the audio.
Propagation
Propagation is the amount of time required for a single packet to travel from one source to the other, almost at the speed of light. Certain lags in the travel duration may cause latency to arrive in audio recordings.
Routers
Routers are responsible for multiple tasks such as analyzing the header information in the packets, adding any required additional information, etc. All of this takes a tad bit of time. Now each packet moves from router to router, which significantly increases the latency time.
Storage Delays
When a packet is stored or accessed in the system, it may cause a delay due to the intermediate devices like switches or bridges, which results in storage delays and increased latency time.
Solutions
We indeed have limited options when it comes to eliminating the network latency in audio. Here are some easy solutions that can help reduce to a certain extent and make data transmission smoother.
Cable Up!
Most people tend to connect their routers via Wifi which may reduce the transmission speed.
If you are one of them, try connecting the router using an ethernet cable, and you can see a sudden increase in the data transmission speed.
This is because ethernet cables are built to carry data at higher speeds, resulting in minimal latency of about 1 ms – 5 ms, which may work fine for you.
Reduce Internet Usage While Recording
Multiple downloads, media streaming, browser usage, and similar other internet-related services within your systems can significantly degrade the transmission flow. Eliminate unnecessary tasks while recording your podcast, and you can witness a visible difference in the speed of your internet connection. This is because free such resources allow your modem to provide more bandwidth for your online recording session instead of distributing to multiple sources.
Kill The Video (Start Screen Sharing)
Videos are an additional burden to every packet of data, along with the audio within a session. While video interview podcasts are a great option to build your audience, you may want to turn off the video and start screen sharing instead of continuing the session. This directly reduces the latency and improves the quality of the audio due to less usage of data.
Call Your Internet Provider
If you are constantly experiencing slow internet connectivity even after following all the points mentioned above, contact your internet service provider for the issue. They may suggest increasing the bandwidth, but it is not a suitable solution for the latency problems caused due to the bottleneck junction. Either way, they will figure out a better solution as per your requirements.
Network Latency Measurement
Measuring network latency levels before recording your podcast audio is a wiser choice to prevent problems during the audio editing process. With the right processes, you can easily measure network latency rates within multiple locations without any hassle.
Primarily, you can measure network latency with two different methods:
Round Trip Time(RTT)
The Round Trip Time(RTT) is the process of measuring the network latency with tools like Ping, Traceroute, etc. Here, you can measure the amount of time taken between the transmission of the request from the client to the designated server and vice versa.
Time to First Byte(TTFB)
The Time to First Byte(TTFB) measures the time taken to transmit the request from the client to the server and when it receives the first byte of the data.
Computer Latency
While recording audio on a computer, the audio is transmitted through a series of hardware and software. Here is the typical audio signal flow:
Voice > Microphone > Cables > Audio Interface > Driver > RAM > CPU > Driver > Audio Interface > Cables > Monitors > Ears
With such a long journey while recording on computers, there are high chances of latency.
Causes
Some of the common causes include:
- The audio flow in every stage brings at least 1 to 2 milliseconds of processing latency which sums up to a massive count by the end, the audio reaches the ears.
- The cable carrying electricity for the computer to function also brings latency resulting in the delay.
- The distance of the audio output devices from your ears adds up to the latency.
- Additional processes like the DAW account for higher latency rates
- The number of soundtracks recorded or playing, plugins, or any other additional background processes within your system also accounts for the latency rates.
Solutions
Increasing the computer performance indicated using more plugins and tracks, resulting in more delay to the audio due to larger buffers. And vice versa! To reduce the computer latency, you need to balance the accepted latency and the computer performance. Here are some processes that can help to reduce computer latency.
Direct Monitoring
Many modern audio interfaces and USB microphones offer direct monitoring or zero-latency monitoring. Don’t confuse direct monitoring with input monitoring in your DAW since input monitoring delivers you the signal after processing with the latency. In direct monitoring, the signal is rerouted back to the headphones without processing. This means that the audio delivered to you is free from any effects or processing. Hence, no possible delay!
Well, direct monitoring is not really concerned with reducing the latency on your computer. It basically bypasses the processes in the audio flow that tend to add latency during recording.
Turn Off Unnecessary Background Processes
There are multiple background processes and applications like Chrome that run in the background even after closing them. This may add up to the latency.
You can either use a program like the CCleaner to monitor and close unnecessary processes or apps or use your OS in-built cleaner. This will allow more audio data to be processed efficiently and quickly.
Change Your DAW Buffer Settings
The DAW’s audio buffer size controls the amount of data buffered for processing. Higher buffering sizes allow more processing time and higher latency, whereas lower buffers decrease latency but compromise quality.
The best practice while recording your podcasts is to use lower buffer settings in your DAW during the recording process and switch it to higher settings while editing to bring quality audio output.
Check Your Sample Rate
The sample rate and bit depth rate are the prime contributors to the size of the data to be processed. If your processor can handle the load with a sample rate of 48kHz(studio quality), the file size will have 9% less latency than the file recorded at 44.1kHz(CD Quality).
In simpler terms, even though the file size and the packet size will increase, if your processor processes more data at once within each packet, it will result in a quicker processing team and lower latency.
Remove/Bypass Plugins
Plugins are the prime attributes in every system, which is solely dedicated to improving efficiency. It helps better process the audio files for the desired output, but a higher number of plugins will result in higher latency too!
Hence, the smarter choice here is to remove or bypass the plugins while recording the audio to reduce the processing latency rates.
Faster System Components
If changing the DAW components like buffer, plugins, etc., still didn’t give you desired results, you may now upgrade to the components in your computer or directly to your computer for the audio processing.
If you have a faster RAM and CPU, you will experience a decrease in latency while processing the data due to more CPU cores. This ensures the distribution of the work to two multiple processors to make the entire process faster.
Other Types Of Latency – Fiber Optic Latency
Fiber optic cables are a widespread addition to communication systems for many benefits. However, you can find frequent transmission delays in Fiber Optic Latency due to certain aspects like refraction within the fiber optic cable, commute duration for the fiber route, etc.
Causes
Some of the typical causes include,
- Low fiber optic cables tend to decrease transmission rates significantly.
- The route and the overall construction of the entire setup also contribute to the latency.
Solution
Here are some vital steps that can help in reducing the Fiber Optic Latency from your audio:
Choose Higher-Quality Cables
While cables are typically longer investments provided you choose the best quality, most people still tend to compromise on the cable quality and settle for the low-quality ones.
Even though it may save some extra bucks, it is certainly not durable enough and increases the latency rates massively!
Careful Design And Construction
The design and contribution of the entire setup play a significant role in the transmission speed. Every time the fiber optic cable is turned or routed, there could be a significant decrease in the speed of the signal.
Ensure that the cable runs straight without any hindrances for a smoother flow of signals.
Use Amplifiers Or Regenerators
Amplifiers or regenerators are some really great options for boosting signal speeds to reduce latency. At times, the amplifier can also add its own latency. It is essential to set up using the correct engineering standards.
Throughput Calculator
As we said, throughput, latency, and bandwidth go hand in hand. But, bandwidth has a better role in the latency rates.
A throughput calculator is an ideal choice to determine how the latency affects the throughput in hypothetical situations.
You just have to define the application, latency value, and other required spaces and estimate the max throughput you can expect with the latency.
Get the Throughput Calculator from here.
Conclusion
Latency in audio is not something we can completely avoid. Like the noise and reverb, we can limit them to a certain extent with a few measures. It is important to always consider the amount of data, cable quality, file size, equipment, and similar other aspects to judge the final quality of the audio file. All of this will help in reducing the audio latency and delivering lag-free smooth audio for your podcasts!